Create, attach and mount a managed disk to an Azure Linux Virtual Machine.
We’re going to add a new data disk to an existing Azure Linux Virtual Machine and then mount it. We will be using CentOS 7.7 and will go through creating the Virtual Machine without the data disk, modify the ARM template to add the data disk. Then we will SSH into the VM and mount the new disk.
The plan
- Create our existing Virtual Machine with an ARM template
- Modify the ARM template to add a data disk
- SSH into the VM and mount the data disk
1. Create our existing Virtual Machine with an ARM template
The ARM template
This is our existing Virtual Machine without the data disk.
Take the following json and save it somewhere and name it new-vm.json
  1
  2{
  3    "$schema": "https://schema.management.azure.com/schemas/2019-04-01/deploymentTemplate.json#",
  4    "contentVersion": "1.0.0.0",
  5    "parameters": {
  6      "storageName": {
  7        "type": "string",
  8        "defaultValue": "teststorage",
  9        "metadata": {
 10          "description": "Name for our storage account"
 11        }
 12      },
 13      "vmName": {
 14        "type": "string",
 15        "defaultValue": "testvm1",
 16        "metadata": {
 17          "description": "Name for our Virtual Machine"
 18        }
 19      }
 20    },
 21    "variables": {
 22    },
 23    "resources": [
 24      {
 25        "name": "[concat(parameters('storageName'), uniqueString(resourceGroup().id))]",
 26        "type": "Microsoft.Storage/storageAccounts",
 27        "location": "[resourceGroup().location]",
 28        "apiVersion": "2015-06-15",
 29        "properties": {
 30          "accountType": "Standard_LRS"
 31        }
 32      },
 33      {
 34        "name": "test-net",
 35        "type": "Microsoft.Network/virtualNetworks",
 36        "location": "[resourceGroup().location]",
 37        "apiVersion": "2015-06-15",
 38        "properties": {
 39          "addressSpace": {
 40            "addressPrefixes": [
 41              "10.0.0.0/16"
 42            ]
 43          },
 44          "subnets": [
 45            {
 46              "name": "frontendSubnet",
 47              "properties": {
 48                "addressPrefix": "10.0.1.0/24"
 49              }
 50            }
 51          ]
 52        }
 53      },
 54      {
 55        "apiVersion": "2016-03-30",
 56        "type": "Microsoft.Network/publicIPAddresses",
 57        "name": "test-publicip",
 58        "location": "[resourceGroup().location]",
 59        "properties": {
 60          "publicIPAllocationMethod": "Dynamic"
 61        }
 62      },
 63      {
 64        "name": "[concat(parameters('vmName'),'-nic0')]",
 65        "type": "Microsoft.Network/networkInterfaces",
 66        "location": "[resourceGroup().location]",
 67        "apiVersion": "2017-06-01",
 68        "dependsOn": [
 69          "[concat('Microsoft.Network/publicIPAddresses/','test-publicip')]",
 70          "[concat('Microsoft.Network/virtualNetworks/','test-net')]"
 71        ],
 72        "properties": {
 73          "ipConfigurations": [
 74            {
 75              "name": "ipconfig",
 76              "properties": {
 77                "privateIPAllocationMethod": "Dynamic",
 78                "publicIPAddress": {
 79                  "id": "[resourceId('Microsoft.Network/publicIPAddresses','test-publicip')]"
 80                },
 81                "subnet": {
 82                  "id": "[concat(resourceId('Microsoft.Network/virtualNetworks', 'test-net'),'/subnets/','frontendSubnet')]"
 83                }
 84              }
 85            }
 86          ]
 87        }
 88      },
 89      {
 90        "name": "[concat(parameters('vmName'))]",
 91        "type": "Microsoft.Compute/virtualMachines",
 92        "location": "[resourceGroup().location]",
 93        "apiVersion": "2017-03-30",
 94        "dependsOn": [
 95          "[concat('Microsoft.Network/publicIPAddresses/','test-publicip')]",
 96          "[concat('Microsoft.Network/virtualNetworks/','test-net')]",
 97          "[concat('Microsoft.Network/networkInterfaces/',parameters('vmName'),'-nic0')]"
 98        ],
 99        "properties": {
100          "hardwareProfile": {
101            "vmSize": "Basic_A1"
102          },
103
104          "osProfile": {
105            "computerName": "[parameters('vmName')]",
106            "adminUsername": "YOURUSERNAME",
107            "adminPassword": "Your_PASSWORD12345678"
108          },
109          "storageProfile": {
110            "imageReference": {
111              "publisher": "OpenLogic",
112              "offer": "CentOS",
113              "sku": "7.7",
114              "version": "latest"
115            },
116            "osDisk": {
117              "osType": "Linux",
118              "name": "[concat(parameters('vmName'),'-','osdisk')]",
119              "createOption": "FromImage",
120              "caching": "ReadWrite"
121            }
122          },
123          "networkProfile": {
124            "networkInterfaces": [
125              {
126                "id": "[concat(resourceId('Microsoft.Network/networkInterfaces',concat(parameters('vmName'))),'-nic0')]"
127              }
128            ]
129          }
130        }
131      }
132    ],
133    "outputs": {
134    }
135  }
Deploy our ARM template
And our Powershell file (deploy-new-vm.ps1):
 1$subscriptionId = "<YOUR_SUBSCRIPTION_ID>"
 2Select-AzureRmSubscription -SubscriptionId $subscriptionId
 3
 4$resourceGroup = "test-infra"
 5$location = "North Europe"
 6
 7New-AzureRmResourceGroup -Name $resourceGroup -Location $location
 8
 9New-AzureRmResourceGroupDeployment `
10    -Name test-infra-deployment `
11    -ResourceGroupName $resourceGroup `
12    -TemplateFile new-vm.json `
13    -Verbose -Force
Deploy it!
Pull up a PowerShell prompt and make sure you have already run Login-AzureRmAccount, browse to your folder where our two new files are located and run them.
1cd c:\dev\Create-VM-with-ARM\
2.\deploy-new-vm.ps1
2. Modify the ARM template to add a data disk
Now that we have our Virtual Machine up and running, we need to add our data disk.
Modify the new-vm.json file and create a new object called dataDisks.
The following code will add a new 32GB data disk to the Virtual Machine.
 1 "dataDisks": [
 2                {
 3                    "name": "[concat(parameters('vmName'),'-data-0')]",
 4                    "diskSizeGB": 32,
 5                    "caching": "ReadWrite",
 6                    "lun": 0,
 7                    "managedDisk": {
 8                        "storageAccountType": "Standard_LRS"
 9                    },
10                    "createOption": "Empty"
11                }
12            ]
Save the new-vm.json file and deploy it again as you did above by running .\deploy-new-vm.ps1
3. SSH into the VM and mount the data disk
SSH into the Virtual Machine
1ssh <YOUR-VM-IP-ADDRESS>
Elevate privileges
First let’s elevate privileges to run the next commands as the root user
1sudo su
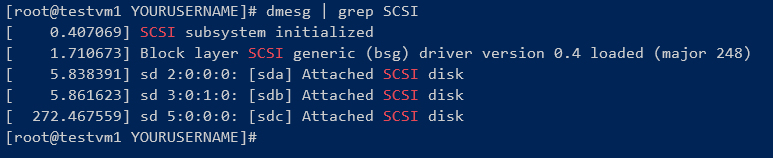
List all the SCSCI disks attached to the Virtual Machine
1dmesg | grep SCSI
Use fdisk to partition
From the output above sdc is our new drive.
So run the following command to partition the sdc disk:
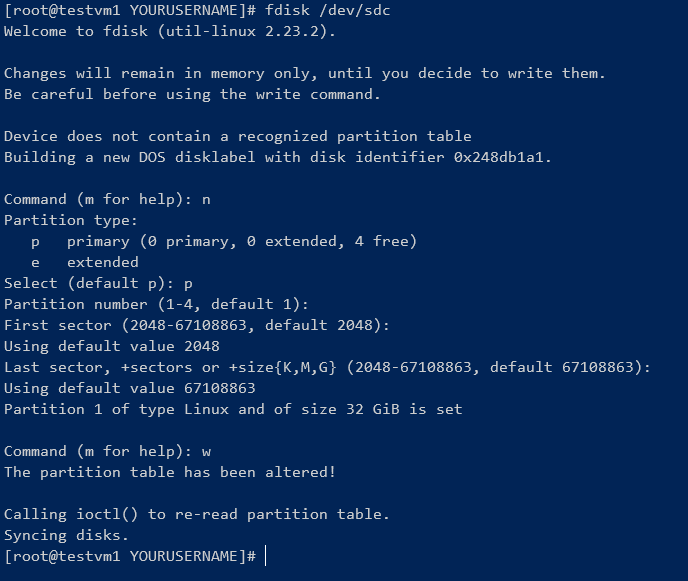
1fdisk /dev/sdc
1. Create new partition
Type n and hit enter to create the new parition.
2. Select primary partition
Type p and hit enter to choose a primary parition
3. Choose default values
Hit enter 3 times to choose the default values for the start, end of the partition and the partition number.
4. Write the changes to the disk
Hit w and enter to write the changes to the disk
Create new filesystem
Now we are going to create a new filesystem with type ext4 on the /dev/sdc1 parition
1. Create ext4 filesystem
1mkfs -t ext4 /dev/sdc1
2. Create new folder and mount drive
1mkdir /data
2mount /dev/sdc1 /data
3cd /data
4ls
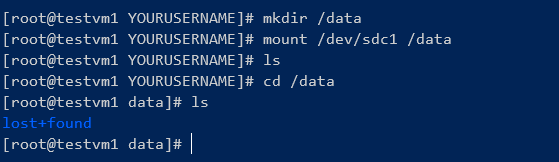
As we can see the lost+found in the list of items it means we have mounted the drive successfully.
Mount automatically on startup
We now need to make sure that the disk is mounted automatically on startup, in order to do this it must be added to /etc/fstab file
1. Run blkid utility to get the UUID
1blkid
Copy the UUID
2. Add it to /etc/fstab
Open up your favourite editor and open the file, I’m using vim here:
1vim /etc/fstab
Add the following line and replace <YOUR_UUID> with your UUID that you copied in the previous step:
1UUID=<YOUR_UUID> /data ext4 defaults,nofail 1 2
3. Reboot the Virtual Machine and check that the mounted data disk is there:
1reboot